- 1.What is the Study Planner?Study Planner is an application designed for students to facilitate their control over their studies. In this application, students can plan what courses they want to complete in each semester and save such a plan and use it as a template when registering courses.
Study Planner features:
- Overview of completed semesters and courses in them.
- Planning of courses for future semesters, including checking whether courses will be listed in selected semesters. The checking of course listings is only predictive based on past course listings. There is no guarantee that courses will be offered in the future.
- An overview of the number of credits in individual semesters and the whole study.
- Prerequisites check for scheduled courses.
- Checking the conditions for advancement to the next semester in accordance with the valid Study and Examination Regulations.
- Save searched courses.
- Enable registration of courses based on the created plan.
- 2.Orientation in the Study Planner applicationThe Study Planner application can be divided into several basic areas – Schedule, individual semesters and the right toolbar. The first and most significant part of the Study Planner application is occupied by the Study Plan section, which contains individual scheduled semesters and there is also a button for entering the next semester. Individual semesters then represent partial parts of the Plan. For each semester, the student can see the period for which the semester is scheduled, the content of the scheduled semester (what courses are scheduled for the semester) and the sum of credits in the scheduled semester. Each course in the semester then contains a code, a course name, and other icons that indicate the scheduling status of the course (see question Inserting courses into semesters). The last important area of the Study Planner application is the right toolbar. In this section of the application, a student can find most of the features of the Study Planner, such as Add Courses, Saved Courses Overview, or Basic Control of Study Passage.
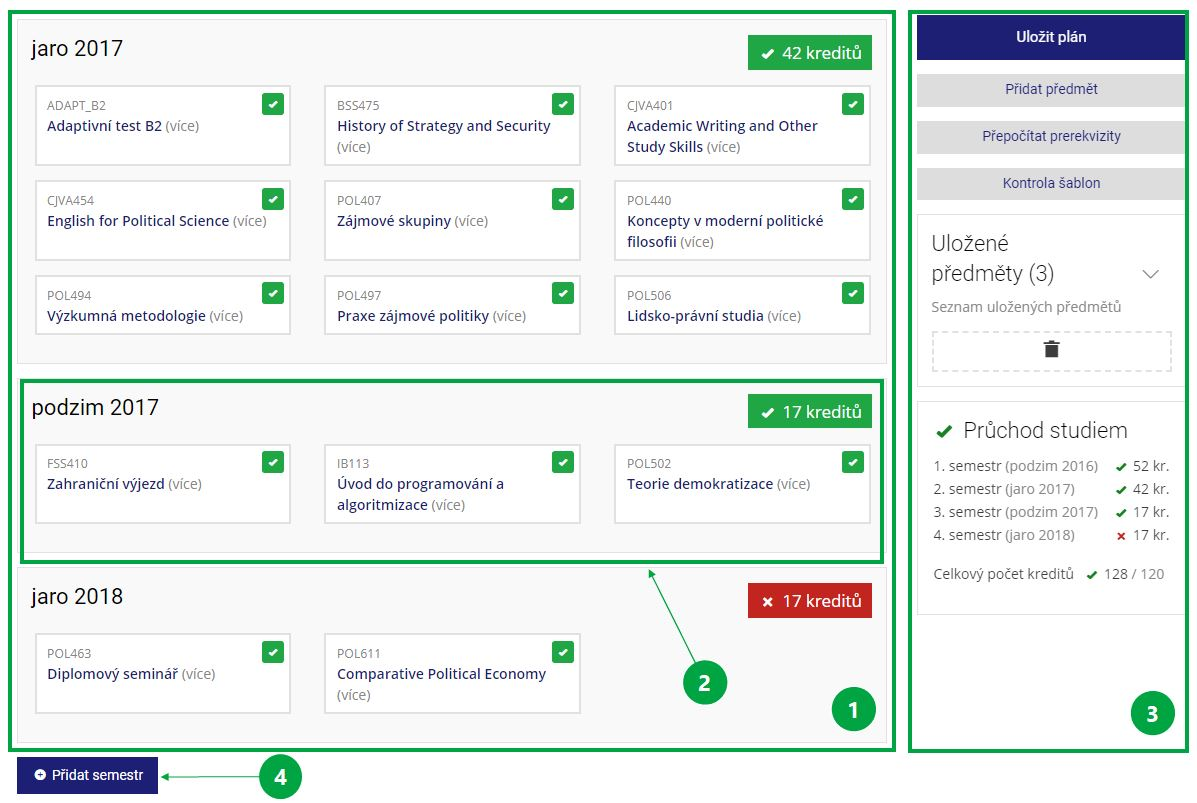
1 Study plan.
2 Single semester in the study plan.
3 Right toolbar for working with the Study Planner.
4 “Add Semester” button.
- 3.Plan your studies using the Study PlannerThe following shows how to work with the Study Planner. This tutorial will be divided into several chapters - adding a semester, finding and adding courses, adding courses to semesters, and saving a plan.
- Adding a semester
The first step a student has to take when creating a plan for his / her studies is to create the appropriate semesters that the student wants to plan. By default, there are several empty semesters in the application that match the standard length of the study. To create a new (next) semester, the student must click the + Add Semester button. This is located in the lower left corner of the Plan section (see screenshot in the previous question).
With the + Add Semester button, a student can add a number of semesters to plan. The default is to always add a semester following the last semester in the curriculum. If the student does not want to plan the next semester (eg if the student plans to interrupt studies for the given semester), he / she can change the semester to the required semester. This can be achieved by clicking on the pencil icon (change the study period) next to the name of the semester. Then a window will appear in which you can change the study period to the desired future semester. In case the student wants to combine 2 scheduled semesters into one, the procedure is as follows. First of all, the student chooses a semester whose content he wants to add to another semester. For this semester, he clicks again on the pencil icon next to the semester name. In a new window, he then selects the appropriate semester with which he wants to merge the current semester.
- Search for courses
Another important step in the planning of studies is to find individual courses that the student is interested in and save them for later insertion into individual semesters. There are two basic ways to find semesters in the Study Planner.
- Search for courses in the Course Catalog
The student can access the search using the Course Catalog by clicking on the Add Course button at the top of the right panel. Clicking this button opens a window with the Course Catalog. In the Catalog, a student can select a number of attributes to filter out the items that are displayed to him / her (eg by faculty and workplace, Period, Template or using the search window). After selecting the filters, the student must click the View button at the top of the window next to the search box. You will then see all the courses that match those filters. To select individual courses that the student wants to add to their plan, it is necessary to tick the checkboxes for each relevant course. A separate help for searching in the Course Catalog can be found in the relevant help..
After selecting the first course, a new bar will appear with information on the number of selected courses with three buttons. The first button from the left is the Show button, which displays a new window with all courses in the current selection and allows you to deselect some courses or deselect all courses. The middle Cancel button allows you to cancel the entire selection. The last button Go to the application, then serves to return to the Study Planner and the selected courses will be transferred to the Saved courses section in the right panel (see chapter Adding a course to the semester).
- In Control Templates
The second way a student can look for courses and add them to their study plan is to use Control Templates. These can be accessed by clicking on the Template Check button located in the right panel at the top. After clicking this button, the student will see a window with three tabs - Study Control Templates, Other Control Templates and Registration Templates. By default, the Student Control Templates tab appears. Here the student will find all the subjects that are linked to his / her currently chosen study. The courses are categorized hierarchically (typically Compulsory Courses, Compulsory Elective Courses or sets of courses according to possible study specializations). Students can open individual categories and choose from a range of courses. For more information, the student can click through (more) in the relevant course field. This function displays basic information for the course, such as the name of the faculty at which the course is taught, the way of completion, the language of instruction and the number of credits. For even more information about the course, the student can click on the course name, which will open the course syllabus in the Course Catalog. To add a course to the study plan, the student must click the button in the relevant course field. This button inserts the subject into Saved Courses (see Question Adding a Course to the Semester).
- Search for courses in the Course Catalog
-
Inserting courses into semesters
After selecting and saving courses in the study plan, all selected courses are saved in the Saved Courses section, located in the right panel. Saved courses always contain parentheses with a number representing the number of courses currently saved. Thus, this function acts as a certain stack of selected courses that the student can insert into individual semesters of the plan. If the student does not see all of the courses in the Saved Courses stack, you need to click the down arrow icon that appears after Saved Courses to expand the menu with all of the courses saved so far.
To add a course to a semester, you need to drag the course from the saved courses menu and paste it into the appropriate semester. After inserting the course in the semester, the course will be deleted from the saved courses. Newly, however, the course (in the upper right corner of the course) in the given semester may display a number of icons that signal further information about the course status (whether it is enrolled, completed, etc.) whether it conflicts with the planned study (eg whether there are any other problems with the possible registration (or enrollment) of the course (eg the course is not enrolled in the given semester). After inserting the courses into the semester, it is always advisable to save the curriculum, otherwise it may be lost (see Saving the curriculum).
Overview of course status icons and their meaning:
 The course has been successfully completed
 The course was unsuccessfully terminated
 The course is scheduled
 The course is registered
 The course is enrolled
 Repeated course
 The course can not be repeated
 The course is offered in the given semester
 The course is not offered for the term
 Unfulfilled prerequisites for entering the course
 - Removing the course from the semester and removing the semesters
If a student wants to remove a course from a given semester or from the Saved Courses section, drag the course to the Trash icon. This is located in the right panel, in the same section as Saved Courses.
If the student wants to remove the entire scheduled semester, it is necessary to remove all courses from the given semester in the first step. After the scheduled semester empty, you need a plan to save again, leading to its deletion from the plan.
-
Save study plan
After planning the study, or any part of it (removing courses or semesters, saving selected courses, etc.), it is necessary to save the study plan. To save, click the Save icon at the top of the right panel. If a student fails to do so and leaves the Study Planner, student loses the entire unsaved study plan.
- Checking the conditions for the next semester
When creating a plan and entering courses into individual semesters, the student also shows whether he / she has fulfilled sufficient conditions for progress to the next semester. The student can see this clearly in the field, which indicates the number of credits in the scheduled semester. If the icon containing the number of credits scheduled for a given semester is green, the students' plan is sufficient to advance to the next semester. Conversely, if the icon is colored red, the plan is insufficient and the student does not fulfill the conditions for progress to the next semester and should adjust their curriculum. If the icon is red (indicating that it is impossible to advance to the next semester), the student can click on it. Then he / she will see a new window in which he / she will have an overview of all the conditions for moving to the next semester and evaluating why in this particular semester his plan does not meet these conditions.
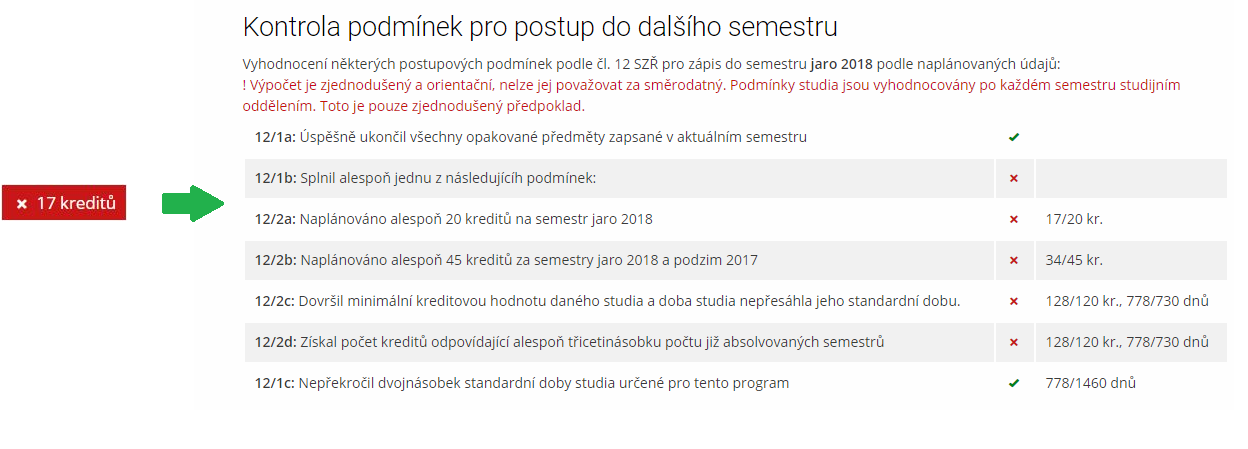
1 Checking the conditions for the next semest.
- Adding a semester
- 4.Register courses using the Study PlannerThe Study Planner application allows you to use the study plan to register the courses in the scheduled semester in addition to the study planning. This feature is only available when at least one of the scheduled courses is enrolled. In addition, the schedule must be saved in order for the student to be able to register courses. So if a student has saved their schedule with courses in the following semester and at least one of the courses can be registered (according to the time schedule of individual faculties), a new button Register courses will appear in that semester. After clicking on this button, the student will be redirected to the Courses Registration application, where all the courses from the schedule that can be registered at the moment will be pre-filled. All that remains is to click Save Changes to register all courses that are in the selected selection and can be registered.
- 5.Checking passing the studyThe study planner not only allows you to plan your studies, but also to check whether such a plan will be sufficient to successfully complete your studies. To control the passage of the study, the student can proceed in the application in two ways - by checking the passage of the study and by checking through the Control templates.
- Passage through study
The student will find the basic check of the course through the study at the bottom of the right panel. The course of study is in the form of a table with individual semesters and the number of credits earned or planned. This function shows the student whether he / she will be able to move on to the next semester according to the set plan and whether he / she will meet the minimum credit value of his / her studies at the end of the plan.
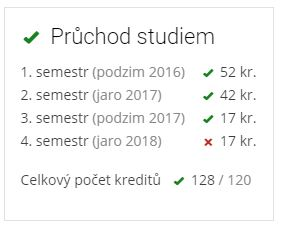
Passing through the studies counts only the gain of credits and conditions for advancement to the next semester. It is not a decisive indicator of whether a student will be able to successfully complete this study because there are no distinctions between compulsory, compulsory, and elective courses.
- Checklist template
The second possibility for the student to check the successful completion of his / her studies is to use Control Templates. These can be accessed by clicking on the Template Check button located in the right panel at the top. After clicking this button, students will see a window with three tabs - Study Control Templates, Other Control Templates, and Registration Templates. By default, students will see the Study Control Templates tab. Here the student will find all the courses that are linked to his / her currently selected study. Another option is to use the Other Control Templates tab, by means of which the student can compare his / her study with Control Templates of other fields. The courses are divided into a tree structure (typically Compulsory Courses, Compulsory Elective Courses or sets of courses according to possible study specializations). The individual levels and parts of the Control template are then marked with a color bar on the left side of the respective level. Each color represents a different level of completion for that section:
- Green – met (all subtree conditions met)
- Orange – enrolled (all conditions of the subtree are met or courses are currently enrolled)
- Red – unfulfilled (one of the subtree courses was unsuccessfully completed)
- Blue – scheduled (all courses required to meet the subtree conditions are scheduled in the Study Planner)
- Gray – conditions not met and none of the previous cases apply
If the student has completed all courses (or other conditions such as the number of credits) required to fulfill the given level, the given level will remain collapsed. Students can use the Control Template to find out which compulsory parts of their studies have already been fulfilled and which courses they have to successfully complete. It is also possible to add the courses to the curriculum using the Control Template function (see Inserting courses into semesters).
Control templates may not always match the real study requirements. Please take control of your study using the Control Templates with reserve. The final decision to meet all study requirements is always within the competence of your study department.
- Passage through study
Provided you have failed to find the information you were searching for, you can contact us at  fi
fi municz