Hormonal Yoga
Faculty of Sports Studies, Masaryk university
Yoga Poses – Asanas
Asanas from the lying position
Supta pawanmuktasana
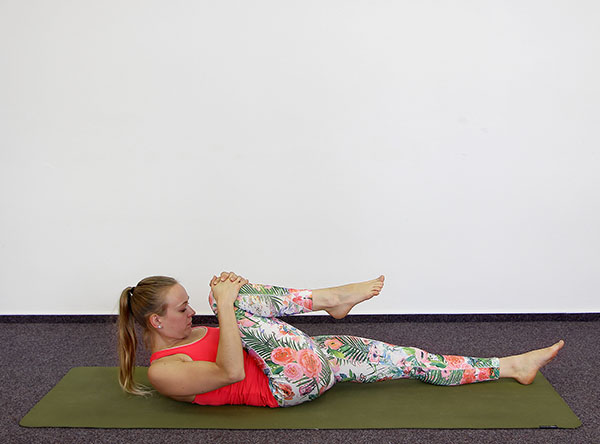
| Starting position | Lying position (Picture 1). |
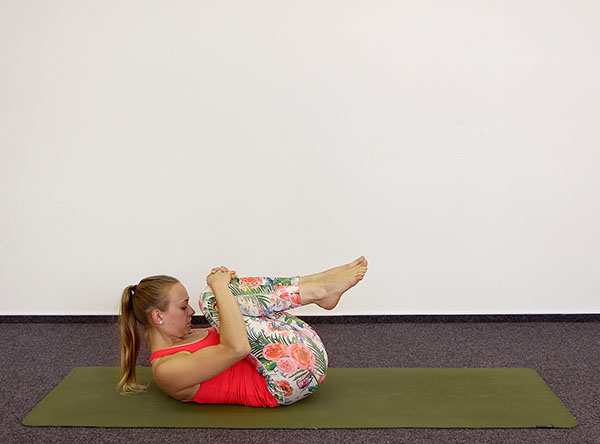
| Action | Exhale and cross the right leg. Hold the knee with the intertwined fingers, the head leaned forward (Picture 2). Breathe 5 times and repeat on the other side. Then inhale and move back to the starting position. Exhale and cross both legs, pull them towards the chest, the head tilted forward (Picture 3). Breathe 10 times. |
| Precision points | It is important to start with the right leg as we compress the ascending part of the large intestine. The left leg then compresses its descending part. The stretched leg is in contact with the mat all the time. If possible, the forehead touches the knee. We breathe naturally. |
| Purposes | This asana stretches the area of the lower back and improves the digestion. It relieves of the constipation and menstrual problems, and stimulates the ovaries. |

Jhulana lurhakanasana
| Starting position | Lying position (Picture 1). |
| Action | Exhale and cross both legs, the intertwined fingers hold the knees, the head tilted forward (Picture 2). Inhale and turn to the right while exhaling (Picture 3). Inhale and return back. Exhale and turn to the left (Picture 4). Repeat 5 times to each side. Inhale again and swing backwards to the cradle (Picture 5). Then swing forward (Picture 6). Repeat 10 times. |
| Precision points | When rocking back, keep the head above the ground. It is advisable to use a softer mat to avoid bruising on the spine. We breathe naturally. |
| Purposes | This asana stretches the area of the lower back and improves the digestion. It relieves of the constipation and menstrual problems, and stimulates the ovaries. |


Supta udarakarshanasana
| Starting position | Lying position (Picture 1). |
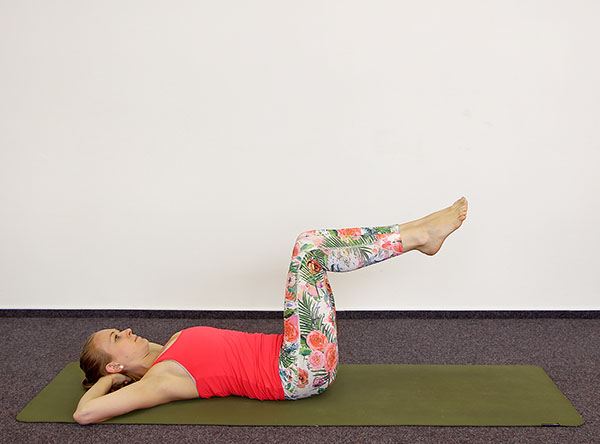
| Action | Put the hands at the back of the head. Bend the legs at the knees and lift them up (Picture 2). Exhale and turn the legs to the right and the head to the left (Picture 3). Stay in the position and breathe for 3s or until it is fine. Inhale and return to the lying position. Then perform to the other side. |
| Precision points | The spinal rotation is performed throughout its whole length, the blades and elbows remain in contact with the ground all the time. The knees are connected. We breathe naturally. |
| Purposes | This asana releases the muscles along the spine. It relieves of the constipation and menstrual problems and stimulates the adrenal glands and the pancreas. |


Naukasana
| Starting position | Lying position (Picture 1). |
| Action | Lift your stretched arms above your body, join your palms together and point your fingers towards your feet. Inhale and bend forward slightly, lift your leg just above the mat (Picture 2). Hold your breath and stay in the position for 3 seconds. Exhale and move back to the starting position. |
| Precision points | The fingers point to the toes, the shoulders and heels do not rise more than 20 cm above the mat. It is advisable to perform the asana before relaxing. The lower back should be placed on the mat. |
| Purposes | This asana releases a mental tension. It stimulates the whole nervous and endocrine systems. To increase the effect, jalandhara bandha can be performed in the pose. |


Bhujangasana
| Starting position | Lying position on the belly (Picture 1). |
| Action | Put your palms and chin on the mat beside the shoulders (Picture 2). Lean backwards while actively engaging the back muscles (Picture 3). Stay in the position and breathe 5 times. Then exhale and relax your body back on the mat. |
| Precision points | The coccyx remains in contact with the mat at all times. The feet are in contact with each other all the time. |
| Purposes | This asana releases spinal tension and stimulates the working of the thyroid gland, adrenal glands and ovaries. It hepls to keep the correct position of the uterus. It is suitable for relieving problems associated with menstrual irregularities and painful menstruation. To increase the effect, we can use ujjayi pranayama. |


Sarpasana
| Starting position | Lying position on the belly (Picture 1). |
| Action | Interlock your fingers behind your back and put your chin on the mat. Lean backward, while looking forwards. Stretch your arms (Picture 2). Stay in the position and breathe 5 times. Then exhale and relax the body back on the mat. |
| Precision points | Pull the shoulders down and the blades towards each other, the head remains in the extension of the spine. |
| Purposes | This asana releases spinal tension and stimulates the workings of the thyroid gland, adrenal glands and ovaries. It helps to keep the correct position of the uterus. It is suitable for relieving problems associated with menstrual irregularities and painful menstruation. To increase the effect, we can use ujjayi pranayama. |


Ardha shalabhasana
| Starting position | Lying position on the belly (Picture 1). |
| Action | Place your hands, with your palms faced down, under the torso. Lock your arms at the elbows and rest your chin on the mat (Picture 2). Stretch your left leg to your back and tilt your head backwards, while looking forwards (Picture 3). V zádrži dechu setrváme v pozici 3 s. Stay in the pose and hold your breath for 3 seconds. Exhale and bring your leg and head back. Repeat on the other side. Repeat 5 times. |
| Precision points | To support the peristalsis, stretch the left leg to the back first. |
| Purposes | This asana releases the tension in the pelvic area. It improves the digestion and excreting. It strengthens the back muscles and gluteuses, stimulates the function of the thyroid gland, adrenal glands and pancreas. To increase the effect, we can use ujjayi pranayama. |


Dhanurasama
| Starting position | Lying position on the belly (Picture 1). |
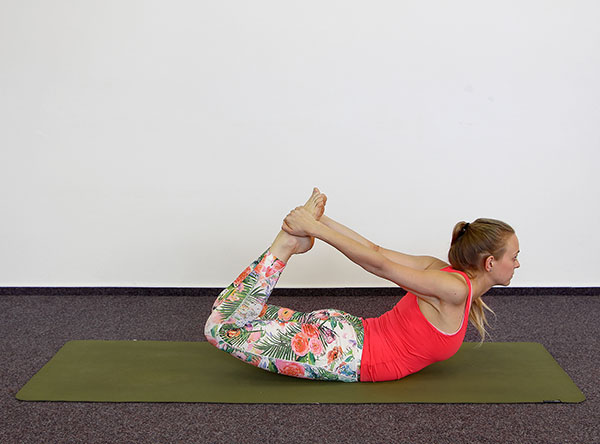
| Action | Bend your legs back and hold your insteps (Picture 2). Inhale and push the insteps into your hands. Hold your breath and bend your torso backwards (Picture 3). Stay in the position for 5 breaths. Then exhale, and bring the body back on the mat. Repeat 3 times. |
| Precision points | The arms are locked at the elbows and the body is relaxed. Only the leg muscles work. |
| Purposes | This asana releases the tension in the pelvic area. It improves digestion and excreting. It strengthens the back muscles and gluteuses, while stimulating the workings of the thyroid gland, adrenal glands and pancreas. To increase the effect, we can use ujjayi pranayama. |


Hasta padangushthasana
| Starting position | Lying position on the belly (Picture 1). |
| Action | Lie on the left side, with your arms strechted out and your palms connected (Picture 2). Inhale and lift up your right arm and leg, place the right hand on the knee (Picture 3). Exhale and bring the leg and arm down. This is a balance position. Repeat 10 times on each side. |
| Precision points | The body is firm, the limbs are locked at all joints. Make sure not to bend forward or backward. |
| Purposes | This asana improves the hip flexibility. It strengthens the back and core muscles. It helps to keep the correct position of the uterus and stimulates the workings of the ovaries. |


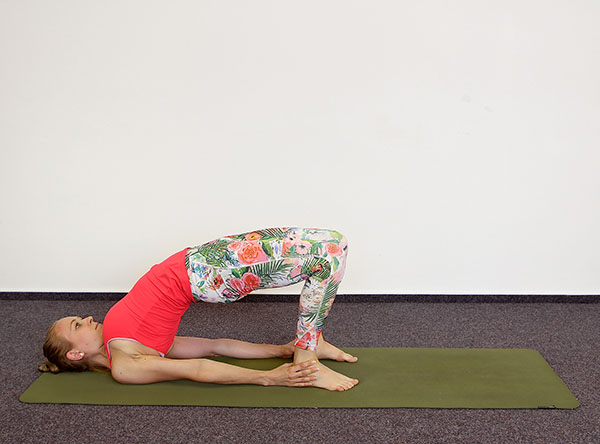
Kandharasana
| Starting position | Lying position (Picture 1). |
| Action | Bend your legs and grab your ankles (Picture 2). Inhale and push your feet into the mat, lift your pelvis and torso as high as possible (Picture 3). Exhale and bring the torso back onto the mat. Repeat 5 times. |
| Precision points | The hands hold the ankles firmly. Lift the spine gradually. |
| Purposes | This asana releases the entire spine and stretches the area of the chest muscles and the shoulders. It improves the digestion and the breathing stereotype. It is suitable for relieving problems associated with menstrual irregularities and painful menstruation. It stimulates the workings of the ovarian and thyroid glands. To increase the effect, jalandhara bandha can be performed in the pose. |


Sarvangasana
| Starting position | Lying position (Picture 1). |
| Action | Inhale, use your abdominal muscles and raise your legs, allow them to sweep over your head until your toes touch the floor. Put your stretched arms on the mat, with your fingers intertwined (Picture 2). Bend your arms and place your hands on your back. Inhale again and raise your legs holding your waist with your palms. Then lower your legs vertically to the ground (Picture 3). Breathe 15 times. |
| Precision points | The hands support the back. Do not transport the weight on the head and neck only. When mastering the asana, we can stay there for up to 5 minutes. |
| Purposes | This asana improves the blood circulation in the legs and relieves difficulties in varicose veins. It regulates the digestion and mobilizes the immune system. It stimulates the entire endocrine system, especially the pituitary gland, the thyroid gland and parathyroid glands. |


Halasana
| Starting position | Lying position (Picture 1). |
| Action | Inhale, use your abdominal muscles and raise your legs, allow them to sweep over your head until your toes touch the floor. Place your stretched arms on the mat, with your fingers intertwined (Picture 2). Breathe 15 times. |
| Precision points | The hands support the back. Do not transfer the weight onto the head or neck only. When mastering the asana, we can stay there for up to 5 minutes. After performing halasana, it is advisable to perform ushtrasana or supta vajrasana as compensatory asanas. To increase the effect, it is possible to use ujjayi pranayama. |
| Purposes | This asana improves the digestion and mobilizes the immune system. It stimulates the adrenal glands, pancreas, thyroid, and parathyroid glands. |


Druta halasana
| Starting position | Lying position (Picture 1). |
| Action | Inhale, use your abdominal muscles and raise your legs, allow them to sweep over your head until your toes touch the floor, grabbing your toes with your hands (Picture 2). Return back to the starting lying position, and then continue to bend forward (Picture 3). Inhale and go back to the lying position. Repeat 10 times. |
| Precision points | Breathe naturally. Do not transfer the weight onto the head or neck only. After performing druta halasana, it is advisable to perform ushtrasana or supta vajrasana as compensatory asanas. Breathe naturally. To increase the effect, it is possible to use ujjayi pranayama. |
| Purposes | This asana improves the digestion and peristalsis. It relieves constipation and stimulates the adrenal glands, pancreas, thyroid, and parathyroid glands. |


